Logic Pro X stands as a robust pillar in the world of music production, offering an extensive toolbox for creators aiming to craft their sonic masterpieces on macOS. As a digital audio workstation (DAW) developed by Apple, Logic Pro X not only carries over the intuitive design elements from Garageband but also escalates your music production capabilities, making it a natural progression for those ready to take their workflow to the next level. Given its status as a paid software, accessible for $199.99 on the Mac App Store and requiring macOS 10.13.6 or later, it asserts itself as a valuable investment in your creative journey.
Diving deep into the essence of Logic Pro X through this tutorial, you’ll acquaint yourself with its comprehensive features, from the initial setup to mastering the art of recording, MIDI programming, and mixing. This Logic Pro X tutorial seamlessly blends industry-specific insights with a step-by-step approach, equipping you with the knowledge on how to use Logic Pro effectively. Whether you’re aiming to fine-tune your existing skills or embark on a new musical endeavor, this guide is designed to inspire and empower, turning your visions into audible reality.
Getting Started with Logic Pro
Embarking on your journey with Logic Pro X begins with understanding its welcoming interface and the plethora of options it presents right from the start. Upon launching Logic Pro X, you’re greeted by a welcome screen that serves as your gateway to creativity. Here’s a quick guide to navigating this initial phase:
Starting New Projects
You have the flexibility to start fresh with an Empty Project, dive into the world of Live Loops for a more interactive experience, or leverage Project Templates tailored to specific genres. These templates are a boon, equipped with the right tempo and instruments to jumpstart your production.
- To create a new project, simply click on “File,” then “New,” and you’ll be prompted to set your project’s parameters under ‘Details’. This includes crucial settings like tempo, time signature, and input/output sources, as well as technical specifications such as sample rate and bit rate.
Track Creation
Logic Pro X simplifies track creation by categorizing them into three main types:
- Blue Audio Tracks: Ideal for recording vocals or instruments through microphones, and for importing rendered audio samples.
- Yellow Drummer Tracks: These are your go-to for adding drums and percussion, providing a dynamic and intuitive way to incorporate rhythm into your projects.
- Green Software Instrument Tracks: Perfect for composing with virtual instruments and loop patterns, these tracks are the backbone of your musical creations.
Navigating the Interface
The Logic Pro X interface might initially remind you of GarageBand, but it hides a vast array of advanced features. By enabling ‘Advanced Tools’ in the ‘Preferences’ menu, you unlock the full potential of Logic Pro X, transforming the interface into a comprehensive workstation. The main window, also known as the Logic Pro Main Window, can be maximized for an immersive experience, allowing you to focus on your project without distractions.
Remember, Logic Pro X is exclusively available through the desktop version of the App Store for $199 USD, offering a full, perpetual license. This investment opens the doors to a world where your musical ideas can flourish, supported by a Digital Audio Workstation (DAW) that’s both powerful and intuitive. Whether you’re a beginner with no prior knowledge of music production or someone looking to refine your skills, Logic Pro X is designed to guide you through the process of creating your first song, offering tips to improve along the way. With key commands for efficient workflow and the ability to record directly after setting up your audio interface correctly, you’re well on your way to mastering Logic Pro X and bringing your musical visions to life.
Understanding Logic Pro’s Interface
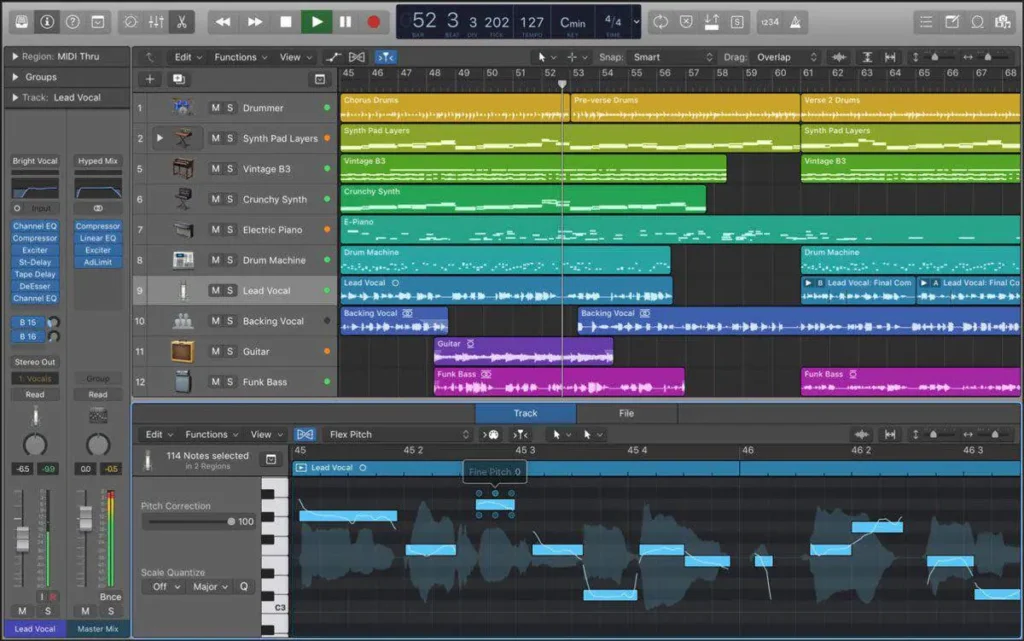
Diving into the heart of Logic Pro X, you’ll find an interface designed with user-friendliness at its core, yet brimming with advanced features for those ready to explore deeper. Here’s a breakdown of the key areas that you’ll interact with:
Tracks Area
This is where your project comes to life, displaying audio and MIDI tracks. Utilize multi-touch gestures for efficient navigation, and for MacBook Pro users, the Touch Bar offers quick access to tools and functions.
Library and Inspector
Located on the left, the Library houses an extensive collection of instruments and sounds. The Inspector, adjacent to the Library, provides detailed control over the selected track’s settings, including volume, pan, and effects.
Mixer and Editors
The lower section of the interface is dedicated to mixing and editing. The Mixer allows for comprehensive control over each track’s levels and effects, while various editors (such as the Audio Editor and Piano Roll) offer precise adjustments to your recordings and compositions.
To ensure a smooth workflow, consider these tips:
- Organization: Use clear and accurate labels for your tracks and employ colors to differentiate between instruments, making navigation and mixing more intuitive.
- Preparation: Prior to editing and mixing, verify that all elements are correctly placed and synchronized. Use Logic Pro X’s Tempo Detection Feature to align the project with the musical grid, adjusting the tempo as needed.
- Understanding Tracks: Recognize the distinction between audio tracks, which handle sound recordings or imported audio, and MIDI tracks, which contain data for virtual instruments. This knowledge is crucial for effective project management.
Furthermore, the Logic Pro X interface is customizable to fit your workflow. Whether you’re recording audio, creating MIDI channels, or applying effects, the Inspector window and the various menus and toolbars provide a comprehensive toolkit at your fingertips. Remember, the key to mastering Logic Pro X lies in familiarizing yourself with these areas and utilizing them to bring your musical visions to life.
Recording and Editing Audio in Logic Pro
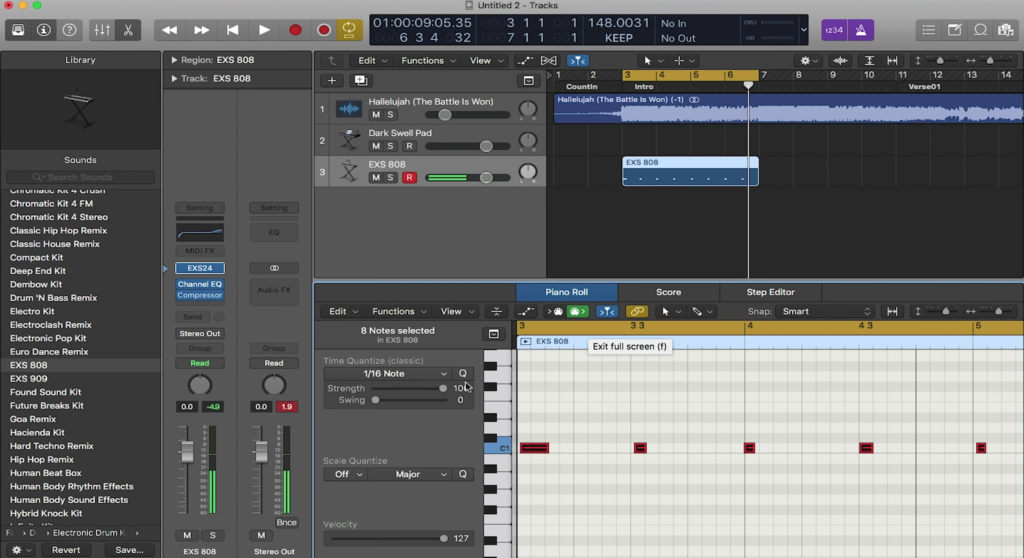
When diving into the realm of recording and editing audio within Logic Pro X, you’re unlocking a suite of powerful features designed to elevate your music production. Logic Pro X supports an impressive array of up to 256 audio tracks and 256 software instrument tracks, coupled with 32-bit floating-point audio for pristine mixing and mastering quality. Here’s a streamlined approach to harness these capabilities:
Recording Audio in Logic Pro X
Setting Up for Recording:
- Add an Audio Channel: Navigate to the ‘+’ icon to add a new audio track.
- Select the Input Source: Ensure the correct input is selected for your microphone or instrument.
- Arm the Track for Recording: Click on the ‘R’ button to arm the track, indicating it’s ready to record.
- Use the Metronome and Count-In: Activate the metronome for precise timing and set a count-in to give yourself a few beats before recording starts.
Recording Techniques
- Multiple Takes: Logic Pro X allows for multiple takes, making it easy to capture the best performance.
- Punch-In/Out: Perfect for fixing mistakes in a specific section without re-recording the entire track.
- Replace Recording: Overwrite a section of audio by re-recording it, ensuring seamless integration.
Editing Audio with Precision
Flex Pitch and Time
- Use Flex Pitch to manually adjust the pitch of notes, correcting any off-key vocals or instruments.
- Flex Time lets you manipulate the timing of audio without altering its pitch, ideal for tightening performances.
Advanced Editing Tools
- Marquee Tool: Select and isolate problematic notes or sections for focused editing.
- Clip Gain: Adjust the volume of specific sections directly on the track for balanced audio levels.
Enhancing Audio Quality
Dynamic Processing
- Compression: Apply compression to even out the dynamic range, though be mindful of its impact on the overall sound character.
- Pitch Shifting and Time Stretching: Create new sounds or fit audio perfectly within your project without compromising quality.
Smooth Transitions
- Crossfades and Fades: Utilize crossfades for seamless transitions between audio regions, with equal power crossfades being particularly effective.
- Time Stretching: Fill gaps between audio regions while maintaining the project’s tempo, ensuring a cohesive musical experience.
By mastering these recording and editing techniques in Logic Pro X, you’re well on your way to producing professional-quality music. Remember, the key to success lies in experimentation and leveraging Logic Pro X’s extensive toolkit to bring your creative vision to life. Whether you’re working on simple recordings or complex multi-track compositions, Logic Pro X equips you with the flexibility and precision needed for high-quality music production.
MIDI Programming and Editing
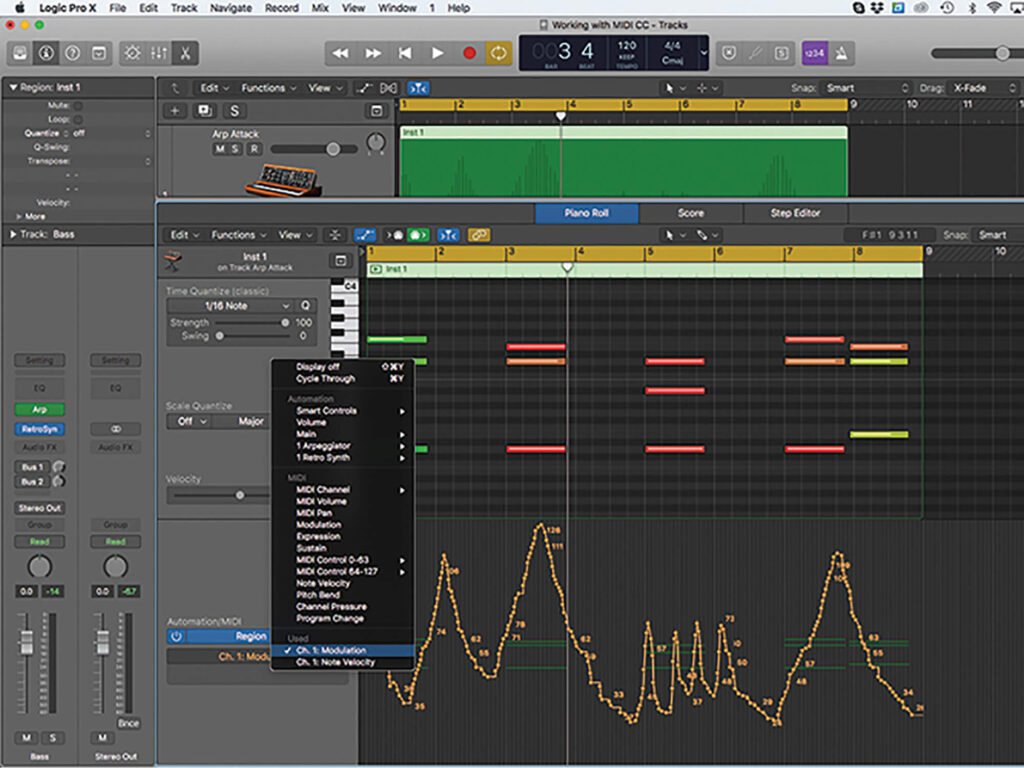
Diving into MIDI programming and editing with Logic Pro X opens up a universe of possibilities for crafting intricate musical arrangements. Logic Pro X’s powerful MIDI capabilities are designed to accommodate both the seasoned composer and the budding musician. Here’s a closer look at how you can leverage these features to enhance your music production:
Creating and Editing MIDI Tracks
Setting Up MIDI Channels
- Choose ‘Software Instruments’ to create a new MIDI channel.
- From the Library, select the desired instrument to infuse your track with its unique sound.
MIDI Editing Techniques
- Utilize the Piano Roll Editor for granular MIDI data editing. This tool is indispensable for tweaking individual notes or complex chords.
- For rhythmic perfection, apply Quantization to align notes to the grid, ensuring a tight and cohesive performance.
Advanced MIDI Features
- Drummer Track: Instantly add dynamic drum patterns to your project with the Drummer feature, which provides a range of premade patterns and kits.
- Flexibility with EXS-24 Sampler: Play back samples at varying pitches, giving you creative control over your sound palette.
- MIDI Polyphonic Expression (MPE): Take advantage of MPE support with software instruments for nuanced expression in your performances.
Optimizing MIDI Editing with Logic Pro X Tools
Piano Roll Editor
A central hub for MIDI editing, offering features like:
- Articulation ID Editing: Fine-tune the expression of each note with articulation IDs, adding a layer of realism to software instrument performances.
- Inspector Area: Use this for precise quantization and velocity adjustments, ensuring your MIDI notes perfectly convey your musical intent.
Useful Tools for MIDI Editing
- Pencil Tool: Ideal for adding new notes to your composition.
- Marquee Tool: Select and edit specific sections of your MIDI arrangement with ease.
- Velocity Tool: Adjust the strength of each note by listening and observing the color intensity, which reflects velocity levels.
By embracing Logic Pro X’s MIDI programming and editing capabilities, you’re equipped to sculpt detailed and expressive musical pieces. Whether you’re orchestrating a complex symphony with software instruments or laying down a groovy drum pattern, these tools and techniques will ensure your creative vision is realized with precision and flair. Remember, the key to mastering these features lies in experimentation and practice, so dive in and start exploring the vast musical landscape that Logic Pro X offers.
Mixing and Mastering in Logic Pro
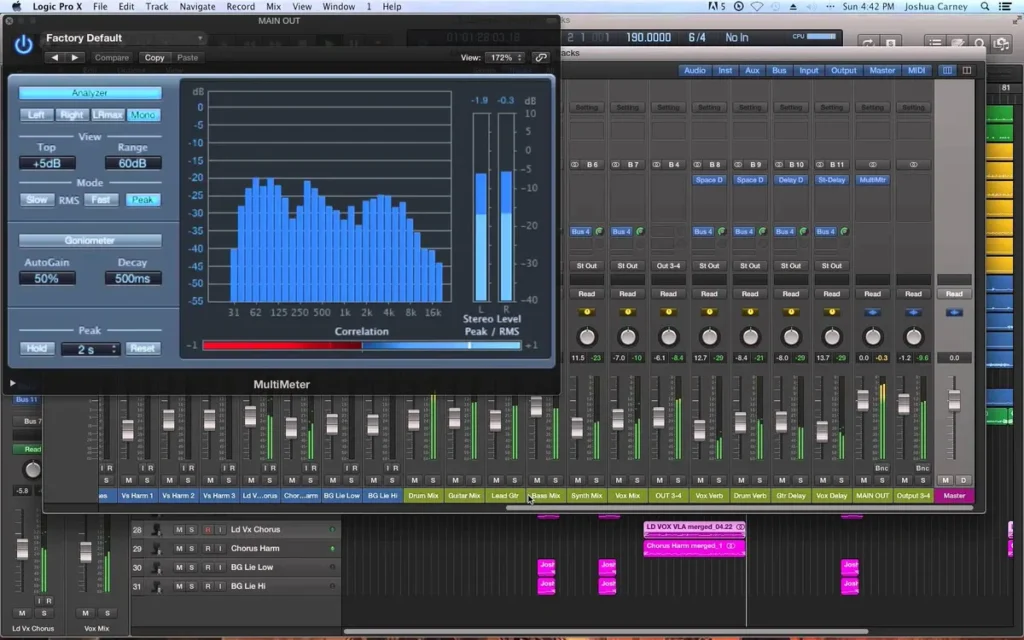
Embarking on the journey of mixing and mastering in Logic Pro X, it’s essential to approach this final stage with a blend of technical prowess and creative intuition. Here’s a streamlined guide to refining your tracks:
Mixing Essentials
- Volume and Effects: Utilize the mixer window to meticulously adjust volumes and add effects, ensuring each track sits perfectly in the mix.
- Stereo Out Channel: Affect the entire mix by applying dynamics, EQ, and limiter to the stereo out, starting with a 6 dB gain for a cohesive sound.
- Instrument and Vocal Mixing:
- Drums and Bass: Mix the drums and 808s, focusing on the beater around 1 kHz for the kick drum, and applying EQ to ensure the kick and 808 don’t clash.
- Vocals: EQ the lead vocals track stack, apply mild compression, and use a de-esser to remove sibilance. Add reverb and delay for depth.
- Instruments: Fill gaps with EQ on piano, Rhodes, bass, and drums. Compress the keys bus and add a bit crusher to the drum kit for cohesion.
Mastering Techniques
- Preparation: Prepare your mix by ensuring it is not clipping and bounce it to a 24-bit WAV file. Calibrate your mastering level using various playback systems for a balanced sound.
- Dynamic Range and Loudness:
- Adaptive Limiter: Use Logic Pro X’s Adaptive Limiter as the final plugin in your chain, setting the ceiling to -1.0 with True Peak Detection turned on.
- Loudness Standards: Aim for a loudness level between -10 to -14 LUFS, ensuring your song meets the desired standards for different platforms.
- Frequency and Dynamics:
- EQ: Apply a phase EQ to roll off any frequencies below 25 Hz and use the Match EQ tool to analyze and apply the frequency spectrum of a reference track to your mix.
- Compression: Utilize a multiband compressor (Multipressor in Logic Pro X) to compress different frequency ranges separately, adjusting the stereo spread for a wider mix.
Final Touches and Export
- Reference Tracks: Gain stage your reference track in the mastering session, adjusting the gain of your mix to match the perceived loudness of the reference track.
- Export: After mastering, bounce the track in the desired format (e.g., WAV, 16-bit, 44.1 kHz Sample Rate) for distribution.
By following these steps and leveraging Logic Pro X’s extensive toolkit, including third-party plug-ins, surround sound mixing capabilities, and unique mastering tools like Adaptive Limiter and Match EQ, you’re equipped to produce music that stands tall on any platform. Remember, mixing and mastering are not just technical processes but also an art form where your creative vision comes to life.
Compare Logic Pro X with other major players like Fl Studio and Ableton!
Conclusion
Embarking on the journey through Logic Pro X, we’ve explored its vast capabilities, from the basic steps of setting up and navigating the interface, to the intricate processes of recording, editing, MIDI programming, and the fine art of mixing and mastering. This comprehensive guide has equipped you with the knowledge and tools necessary to transform your musical ideas into professional-quality productions. The seamless integration of advanced features and an intuitive user interface makes Logic Pro X an indispensable asset for music creators at any level of expertise.
FAQs
Q: Can Logic Pro X be effectively used for mastering audio tracks? A: Yes, Logic Pro X is an excellent digital audio workstation equipped with a variety of built-in plugins that enable users to master audio tracks to a professional standard directly within the software.
Q: What are the essential steps involved in the mastering process? A: The key steps in mastering include completing your mix, bouncing down the stereo track, starting a new session to import your stereo mix and reference tracks, listening to the mix and taking notes, applying limiting, adjusting levels with Master Rebalance if needed, and enhancing the clarity of the low end.
Q: How can one perform a quick mastering session in Logic Pro X? A: To quickly master a track in Logic Pro X, you can follow these steps: stage the gain of your reference tracks, use Logic’s “Match EQ” tool, set the desired loudness, and make use of the “Adaptive Limiter” feature. These tools and features streamline the mastering process within the software.
Q: What is the latest mastering tool available in Logic Pro X? A: The latest mastering tool in Logic Pro X is the Mastering Assistant plug-in. It is designed to optimize your final mix for consistent playback on any device. The plug-in works by analyzing the audio and automatically making dynamic adjustments, precise frequency corrections, and various sonic enhancements to improve the overall sound.
This post may contain affiliate links. If you make a purchase through these links, we may earn a small commission at no additional cost to you.

