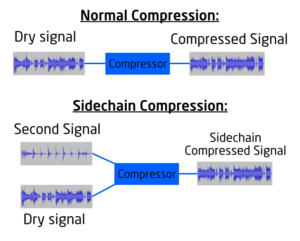
Are you an aspiring music producer looking to elevate your tracks? Mastering the art of mixing, which is the process of blending and refining individual audio tracks, is essential for creating a polished and unified final mix. This comprehensive mixing guide will provide you with the step-by-step instructions on how to mix music, equipping you with the tools and knowledge for audio mixing that will allow you to produce pro-level mixes confidently from your home studio.
What is Mixing in Music?

Before we delve into the nuances of mixing, it’s crucial to comprehend what audio mixing truly involves. What is audio mixing? It’s the art of combining and fine-tuning individual audio tracks or song elements to produce a final stereo or multichannel mix. As a vital phase in music production, typically executed by a mixing engineer or producer, the primary objectives of mixing are to achieve a balanced, unified, and sonically pleasing sound that resonates well on various playback systems, including speakers and headphones. Understanding this equips us better in following the process of how to mix music.
The Elements of Mixing Music
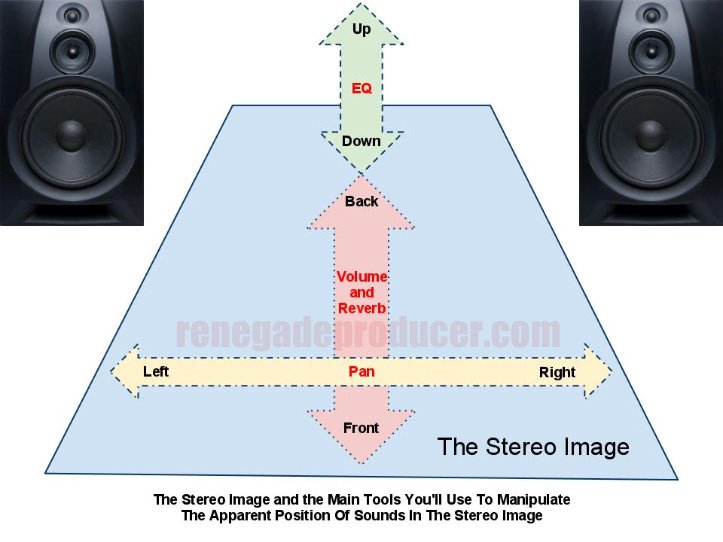
To excel in music mixing, it’s important to understand the mixing basics that form the foundation of the art itself. While it may appear as a complex web of mixing techniques, at its heart, it revolves around shaping five key elements: balance, stereo image, tonal balance, dynamics, and space. These basic mixing elements are the cornerstone of every exceptional mix, and mastering how to manipulate them is crucial for achieving professional outcomes.
Balance
Achieving a balanced mix is about setting proper volume levels for each audio element to ensure no single component dominates. It’s about crafting the right volume balancing between instruments and vocals to create a harmonious sound. Balancing the mix is essential for creating clarity and allowing each part of the mix to be distinctly heard.
Stereo Image
The stereo image is about the spatial arrangement of audio elements within the left-to-right auditory field. It involves panning instruments and sounds to craft a sense of width and localization within the stereo mix. By strategically placing elements in the stereo field, you can create a three-dimensional listening experience for your audience.
Tonal Balance
Tonal balance is about the frequency content of the mix, focusing on shaping the sound by adjusting equalization (EQ) to ensure that different instruments occupy their respective frequency ranges without overlapping. This approach to the frequency response and frequency spectrum is essential for a clear and well-defined mix, allowing for proper separation between instruments within the frequency range.
Dynamics
Dynamics involve controlling variations in volume and intensity within a piece of music. Techniques like compression are used to even out volume fluctuations, ensuring that no element is excessively loud or quiet, which leads to a balanced and controlled mix. Effective gain staging and managing dynamics are crucial for preserving the energy and impact of the music.
Space
Creating space in a mix involves simulating depth and dimension. Techniques like reverb and delay are used to add a sense of distance and position to audio elements, making them appear closer or farther away within a three-dimensional soundstage. The art of creating space is essential for achieving a natural and immersive listening experience.
How to Mix Music: Step-by-Step Guide
Now that you have a solid understanding of the elements of mixing, let’s delve into the step-by-step process of how to mix music. This comprehensive mixing guide will walk you through each stage, from organizing your session to applying essential techniques and effects, ensuring your mix tutorial is a success.
Step 1: Organize Your Session
Before we look at how to mix music in practice, it’s crucial to organize your session for maximum efficiency. A clutter-free and well-organized workspace, known as mix prep, will save you time and allow you to focus on the creative aspects of mixing. Here are some key steps to consider:
- Track Labeling: Clearly label each track in your session to avoid confusion and save time during the mixing process.
- Track Grouping: Group related tracks together, such as drums, vocals, and guitars. This allows for easier processing and automation of multiple tracks simultaneously.
- Session Organization: Arrange your tracks logically, placing drums at the top, followed by bass, guitars, vocals, and other instruments or effects returns. This logical arrangement makes navigation and editing more intuitive.
- Backup Your Project: Before you start mixing, make sure to save a backup of your project. This ensures that you can revert to a previous state if needed.
- Aux Tracks: Set up aux (auxiliary) tracks for effects and bussing. Aux tracks allow you to route multiple channels to a single aux track for applying reverb, delay, or other effects efficiently.
Step 2: Set Instrument Levels
Once your session is organized, it’s time to set the levels of each instrument. This step is crucial for achieving volume balancing, ensuring a balanced mix and that no element overpowers the others. Here’s a step-by-step approach:
- Begin with the busiest section: Start by looping the busiest section of your song, such as the chorus or a section with many instruments playing simultaneously. Mixing in the context of a busy section allows you to hear how different instruments interact with each other during the most intense moments of the song.
- Zero out the mix: Reset all faders and plugins to their default positions. This allows you to start with a clean slate and ensures that no previous settings interfere with your mix.
- Set the prominent element: Identify the most prominent or dominant element in your mix, such as the lead vocal or the primary instrument carrying the melody. Adjust its fader to a level where it’s comfortably audible but not overpowering.
- Balance the supporting instruments: Gradually bring in the supporting instruments one by one, focusing on the rhythm section (drums and bass) next. Balance them with the lead element so that they work together harmoniously.
- Compare levels with reference tracks: Listen to professionally mixed tracks in a similar genre and compare the levels between different instruments. Aim for a similar balance in your mix, ensuring that no element stands out too much or gets lost in the mix.
Step 3: Position Instruments in the Stereo Field
After setting instrument levels, it’s time to position each instrument within the stereo field. The stereo image is a powerful tool for creating depth and width in your mix. Here are some guidelines for positioning instruments to enhance the stereo image:
- Keep bass and main elements centered: For a solid foundation, keep bass elements and main instruments centered in the stereo field.
- Use panning for spatial separation: Experiment with panning to create separation between instruments. Place instruments strategically left or right to create a sense of space and width. Be mindful of maintaining balance, so the mix doesn’t feel lopsided.
- Consider panning conventions: Certain instruments, like kick drums, snares, and lead vocals, are typically kept centered to maintain focus and impact. However, feel free to experiment and use panning creatively to enhance your mix.
Step 4: Shape the Tonal Balance with EQ
EQ is a powerful tool for shaping the frequency content of your mix. By adjusting EQ settings, particularly subtractive eq, you can create separation between instruments and enhance their sonic characteristics within the frequency range. Here’s how to use EQ effectively:
- Address frequency issues: Start by identifying and addressing any frequency problems in your tracks. Use subtractive EQ techniques to reduce harsh frequencies, remove unnecessary low-end frequencies, and tame resonances.
- Carve out sonic space: Use EQ to create distinct sonic spaces for each instrument. Identify overlapping frequency ranges between instruments and reduce or boost specific frequency bands to achieve clarity and separation.
- Enhance desired qualities: Use EQ to enhance the desired qualities of each instrument. Boosting high frequencies can add brightness and presence to vocals, while enhancing low frequencies can add depth and impact to drums or bass instruments.
Step 5: Control Dynamics with Compression
Dynamics play a crucial role in music, and compression is a valuable tool for controlling and shaping dynamics in your mix. Compression helps even out volume fluctuations, ensuring that no element is excessively loud or quiet. Here’s how to use compression effectively to manage dynamics:
- Set the threshold and ratio: Start by setting the threshold and ratio on your compressor. The threshold determines at what level compression will be applied, while the ratio controls the amount of compression applied once the signal exceeds the threshold.
- Adjust attack and release times: Experiment with the attack and release times to shape the envelope of your sound. A fast attack time can add punch and definition to drums, while a slower release time can create a smoother and more natural sound.
- Use parallel compression: Parallel compression, also known as New York compression, involves blending a heavily compressed signal with the original signal to add impact and sustain without sacrificing dynamics. This technique can be particularly effective on drums and vocals.
Step 6: Create Depth and Dimension with Reverb and Delay
To add depth and dimension to your mix, it’s essential to utilize spatial effects like reverb and delay. These spatial effects craft the illusion of space and position within a mix, enhancing the overall listening experience. Here’s how to effectively apply reverb and delay:
- Create a sense of space with reverb: Use reverb to simulate the natural ambience of different environments, such as rooms, halls, or plates. Apply reverb to individual tracks or use send/return tracks for a more cohesive sound.
- Adjust reverb settings: Experiment with reverb parameters such as decay time, pre-delay, and wet/dry mix to achieve the desired sense of space. Short decay times work well for vocals, while longer decay times can enhance the sense of depth for instruments like guitars or keyboards.
- Add dimension with delay: Delay creates echoes that can add depth and rhythmic interest to your mix. Use delay to create rhythmic patterns, add space between notes, or create a sense of movement within the mix. Experiment with delay settings such as delay time, feedback, and modulation to achieve desired effects.
Step 7: Enhance the Mix with Automation
Automation is a powerful tool for infusing expression and movement into your mix. It enables you to dynamically alter various audio parameters over time, including volume, panning, spatial effects, and EQ. Here’s how to harness automation effectively:
- Automate volume changes: Use volume automation to emphasize key moments in your mix. For example, you can automate a volume increase during a chorus or a volume decrease during a verse to create dynamic contrast.
- Create movement with panning automation: Experiment with panning automation to move sounds across the stereo field. This can create a sense of movement and add interest to your mix.
- Fine-tune effects with automation: Automate effect parameters such as reverb wetness, delay feedback, or chorus depth to add movement and tonal shaping to specific sections of your mix.
Step 8: Take Breaks, Review, and Iterate
Mixing is an iterative process, and it’s crucial to take breaks, review your mix with a critical ear, and make adjustments as necessary. Here are some mixing tips for effective review and iteration:
- Take breaks: Taking regular breaks during your mixing sessions is crucial. It helps prevent listening fatigue and allows you to approach your mix with fresh ears.
- Review and listen critically: Come back to your mix with a critical ear. Listen to your mix from start to finish, focusing on different aspects with each pass, such as individual instrument levels, tonal balance, and dynamics.
- Take notes and iterate: Take notes on areas that need improvement and make necessary changes. Remember that mixing is an ongoing process, and each iteration brings you closer to your desired sound.
Step 9: Export and Prepare for Mastering
Once you’re satisfied with your mix, it’s time to focus on preparing for mastering. Follow these steps to ensure your mix is ready for the next stage:
- Check for headroom: Ensure that your mix has appropriate headroom to prevent clipping and distortion during the mastering process. Aim for peak levels around -3 dB to -6 dB.
- Choose the right file format: Select the appropriate file format, such as WAV, AIFF, or FLAC, for exporting your mix. Consider the requirements of your intended distribution platform.
- Communicate with the mastering engineer: If you plan to have your mix professionally mastered, communicate with the mastering engineer, providing specific instructions or notes regarding your desired sonic characteristics and references.
- Backup your project: Before exporting, create a backup of your entire project, including all raw audio files, session files, and settings. This ensures that you have a safety net in case further adjustments are needed.
Step 10: Explore Mixing vs. Mastering
While this guide primarily focuses on how to mix music, understanding the distinction between mixing vs mastering is essential. Mixing is the art of blending and adjusting individual tracks to create a cohesive mix, while mastering is the final step in the production process, aimed at optimizing the mix for various playback systems and preparing it for distribution. Mixing involves balancing individual elements and applying effects, while mastering focuses on enhancing the overall sound, adjusting tonal balance, and ensuring consistency across an album’s tracks.
Step 11: Continue Learning and Experimenting
The art of mixing is constantly evolving, with new techniques on how to mix music emerging, offering more to learn and explore. As you continue learning to mix, don’t hesitate to experiment with innovative tools and methods. Keep absorbing knowledge from industry professionals, immersing yourself in a diverse array of music, and seeking feedback from peers. The more you practice and experiment, the better you’ll become at crafting professional-sounding mixes.
Step 12: Join the Music Production Community
Lastly, consider joining a music production community to connect with fellow producers, share knowledge, and engage in collaboration. Being part of a community of like-minded individuals can offer valuable feedback, inspiration, and opportunities for growth. Whether through online forums, social media groups, or local meetups, find a community that supports and nurtures your passion for music production. Join our newsletter below for weekly tips on how to mix music as well, and much more !
Remember, mixing is both an art and a science. It takes time and practice to develop your skills, but with dedication and a willingness to learn, you can create professional-sounding mixes that make your music shine. So grab your headphones, fire up your DAW, and let your creativity soar as you embark on your journey of music mixing! Check out the best mixing consoles to streamline your workflow here!
This post may contain affiliate links. If you make a purchase through these links, we may earn a small commission at no additional cost to you.

