As an aspiring musician or producer, you want your music to sound professional and polished. One crucial step in achieving that level of quality is mastering your songs. In this comprehensive guide, we will take you through the process of mastering a song, providing you with the knowledge and tools you need to elevate your music to the next level.
What is Music Mastering?

Before we dive into the details, let’s start by understanding what mastering is and why it is essential for your music. Mastering is the final step in the music production process, following the mixing stage. It involves applying various techniques and tools to enhance the overall sound of your song, ensuring it sounds cohesive, balanced, and ready for distribution.
While mixing focuses on the individual elements of a song, such as the levels, panning, and effects of each track, mastering takes a broader perspective, considering the entire mix as a whole. It aims to optimize the sonic qualities of your music, making it sound consistent, professional, and enjoyable across different playback systems and platforms.
The Importance of Music Mastering
Mastering plays a crucial role in ensuring your music stands out in a competitive industry. Here are a few reasons why mastering is essential:
- Loudness and Volume Control: One of the primary goals of mastering is to achieve a consistent and optimal loudness level across all tracks in an album or playlist. This ensures a smooth listening experience without the need for constant volume adjustments.
- Enhanced Sound Quality: Mastering allows for refinement and enhancement of the overall sound of your music. It can improve clarity, depth, and dynamics, bringing out the best qualities of each instrument and vocal.
- Tonal Balance and Frequency Control: Through mastering, you can address any tonal imbalances in your mix. By using equalization techniques, you can shape the frequency response of your music, ensuring that each element occupies the right sonic space and sounds pleasing to the ear.
- Consistency: Mastering ensures consistency in the sonic characteristics of your music, making it sound cohesive and professional. It helps create a unified sound across an album or a playlist, enhancing the overall listening experience.
Mixing vs Mastering: Understanding the Difference

Before we delve into the process of mastering, it’s essential to understand the distinction between mastering and mixing. While the two terms are often used interchangeably, they refer to distinct stages in the music production process.
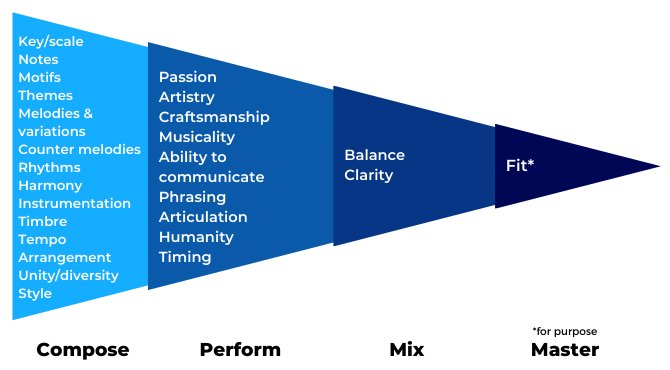
Mixing is the process of combining individual tracks, adjusting their levels, panning, applying effects, and creating a cohesive mix. It involves making creative decisions to ensure that each element in the mix blends well together and creates a balanced and engaging sonic experience.
Mastering, on the other hand, is the final step that takes place after the mixing process. It involves fine-tuning the mix, making overall sonic adjustments, and preparing the final product for distribution. Mastering focuses on optimizing the overall sound of a song or an album, ensuring it sounds its best across different playback systems and platforms.
While mixing is often done by the music producer or engineer responsible for the creative aspects of the production, mastering is typically carried out by a specialized mastering engineer or done by the artist themselves, depending on the resources and expertise available.
The Step-by-Step Process for Mastering a Song
Now that we have a clear understanding of what mastering is and why it is crucial, let’s dive into the step-by-step process of mastering a song. This guide will provide you with a comprehensive framework to follow, allowing you to achieve professional-sounding results.
Step 1: Creating the Ideal Listening Space
The first step in the mastering process is to create an ideal listening environment. While this may not be feasible for everyone, optimizing your listening space as much as possible can significantly impact the accuracy of your mastering decisions.
Here are some tips to improve your listening environment:
- Acoustic Treatment: Consider treating your room with acoustic panels or bass traps to minimize unwanted reflections and resonances. This helps create a more accurate representation of the sound.
- Speaker Placement: Position your speakers correctly, ensuring they are at an equal distance from your listening position and forming an equilateral triangle. This helps create a balanced stereo image.
- Room Calibration: Utilize room calibration software or hardware, such as Sonarworks Reference or Waves NX, to compensate for any room-related frequency anomalies.
Step 2: Perfecting Your Mix
Before diving into the mastering process, it’s essential to ensure that your mix is as polished as possible. Mastering can enhance your mix, but it cannot fix fundamental issues. Spend time refining your mix to achieve the desired sonic balance, clarity, and impact.
Here are some key aspects to focus on during the mixing stage:
- Levels: Ensure that each track in your mix is appropriately balanced, with no clipping or excessive peaking.
- Panning: Place each instrument or sound element in the stereo field to create a sense of width, depth, and separation.
- Frequency Balance: Use equalization to address any tonal imbalances and ensure that each instrument occupies its intended frequency range.
- Dynamic Range: Pay attention to the dynamic range of your mix, ensuring that it has appropriate contrast between the quietest and loudest parts.
Step 3: No Clipping Before the Bounce
Before exporting your mix for mastering, ensure that there is no clipping or digital distortion in any of the individual tracks or the master output. Clipping can lead to a loss of audio quality and make it challenging to achieve a clean and professional master.
Check the levels of each track and the master output, ensuring that they are well below 0dB to leave enough headroom for the mastering process.
Step 4: Bouncing Your Mix
Once you have perfected your mix and ensured there is no clipping, it’s time to bounce or export your mix as a high-quality audio file. Ensure that the export settings match the resolution of your mix, typically 24-bit and 48kHz.
It’s also crucial to export your mix as a lossless file format, such as WAV or AIFF, to preserve the audio quality without any compression or loss of data.
Step 5: Taking a Break
After bouncing your mix, it’s essential to take a break before diving into the mastering process. Give yourself some time away from the mix, preferably at least a day, to refresh your ears and gain a fresh perspective.
Returning to the mix with rested ears will allow you to make more accurate and objective decisions during the mastering process.
Step 6: Starting a New Project in Your DAW
To begin the mastering process, create a new project in your digital audio workstation (DAW) and import your bounced mix. This separate project will be dedicated solely to mastering, allowing you to apply specific mastering techniques without affecting your original mix.
By working in a new project, you can maintain the integrity of your mix while making precise adjustments tailored to the mastering stage.
Step 7: Listening and Taking Notes
The first step in the mastering process is to listen to your mix attentively and take notes on areas that require improvement. This initial listening session should be focused and unbiased, allowing you to identify specific aspects that need attention.
Pay attention to the overall tonal balance, dynamics, clarity, and any potential issues such as frequency imbalances or excessive sibilance. Take note of these areas to guide your subsequent mastering decisions.
Step 8: Analyzing Your Mix
After your initial listening session, use visual analysis tools such as graphic analyzers to examine the frequency spectrum and dynamics of your mix. This can provide valuable insights into areas that need adjustment and help you make informed decisions during the mastering process.
Compare your mix to reference tracks or commercially released songs in a similar genre to gain a better understanding of the desired sonic characteristics and industry standards.
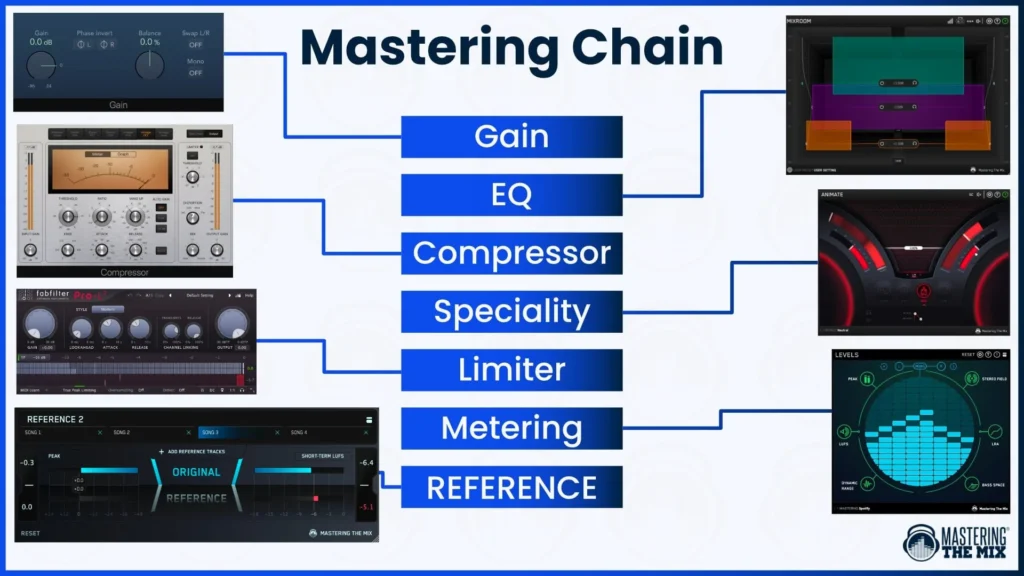
Step 9: Compression
Compression is a fundamental tool used in mastering to control the dynamics of a mix and achieve a more balanced and consistent sound. Apply compression cautiously, aiming to enhance the overall impact and cohesion of your mix.
Start with a low ratio, such as 2:1, and adjust the threshold and attack/release settings to achieve the desired effect. Remember that subtle compression is often more effective than heavy-handed compression, so avoid excessive gain reduction that may compromise the natural dynamics of your mix.
Step 10: Equalization (EQ)
Equalization is a powerful tool used in mastering to shape the frequency response of your mix and address any tonal imbalances. Apply EQ sparingly and with precision, targeting specific frequencies that need adjustment.
Refer to your notes and analysis from earlier to identify areas that require attention. Use gentle boosts or cuts, typically within a range of 1-3dB, to achieve a more balanced and pleasing tonal balance in your mix.
Step 11: Saturation and Harmonic Enhancement
Saturation is a technique used in mastering to add warmth, depth, and richness to a mix. It emulates the characteristics of analog equipment, introducing subtle harmonic distortion that can enhance the overall sound.
Apply saturation cautiously, using plugins or hardware units that offer different saturation algorithms. Experiment with different settings and intensities to achieve the desired warmth and character while avoiding excessive distortion or muddiness.
Step 12: Stereo Imaging
Stereo imaging refers to the placement and width of sound elements within the stereo field. It can add depth, dimension, and spaciousness to your mix, enhancing the overall listening experience.
Use stereo wideners or imaging plugins to adjust the width and localization of different elements in your mix. However, exercise caution to avoid creating an overly exaggerated stereo image that may cause phase cancellation or an unnatural listening experience.
Step 13: Limiting and Loudness Maximization
The final step in the mastering process is to apply limiting to achieve optimal loudness and ensure your mix stands up against commercially released songs. Limiting allows you to increase the perceived loudness without causing distortion or compromising the dynamic range.
Set the threshold and release settings of your limiter to achieve a balanced and controlled sound. Be mindful not to over-compress or squash the dynamics excessively, as this can result in a loss of clarity and impact.
Step 14: Bouncing Your Final Master
Once you are satisfied with the adjustments made during the mastering process, it’s time to bounce your final master. Export the mastered mix using the appropriate settings for distribution, typically 16-bit and 44.1kHz in WAV format.
Ensure that your export settings do not include normalization, as this can alter the perceived loudness and undo the adjustments made during mastering. Aim for a well-balanced and impactful master that sounds professional across different playback systems and platforms.
Conclusion
Mastering a song is an essential step in the music production process, allowing you to enhance the overall sound and quality of your music. By following the step-by-step process outlined in this guide, you can confidently master your own songs and achieve professional-sounding results.
Remember, mastering is an art that takes time and practice to master. Continuously refine your skills, listen to reference tracks, and seek feedback from trusted sources to further improve your mastering abilities.
Embrace the power of mastering and unleash the full potential of your music. With dedication, perseverance, and a willingness to learn, you can elevate your music to new heights and captivate your audience with a polished and professional sound. Start mastering your songs today and embark on an exciting journey of sonic excellence.
This post may contain affiliate links. If you make a purchase through these links, we may earn a small commission at no additional cost to you.


